Digital Signature
Digitally Signing a Web page as the name implies signing a webpage using digital certificate for maintaining the authenticity of the page. The most common use of a digital certificate is to verify that a user sending a message is who he or she claims to be, and to provide the receiver with the means to encode a reply. We can either use self-signed certificate or the certificate issued by Certificate authority (CA). The CA issues an encrypted digital certificate containing the applicant’s public key and a variety of other identification information. The CA makes its own public key readily available through print publicity or perhaps on the internet. Both self-signed and CA signed certificates provide encryption for data in motion. A CA-signed certificate also provide authentication – a level of assurance that the site is what it reports to be, and not an impostor website.
Implementation
Step 1: Here I am using Self-signed certificate for signing the webpage. So first step will be to create the Self-signed certificate. Open IIS Manager by going to start and type inetmgr to open IIS. Choose server certificate and click create self-signed certificate in the action pane.
 |
| IIS Manager |
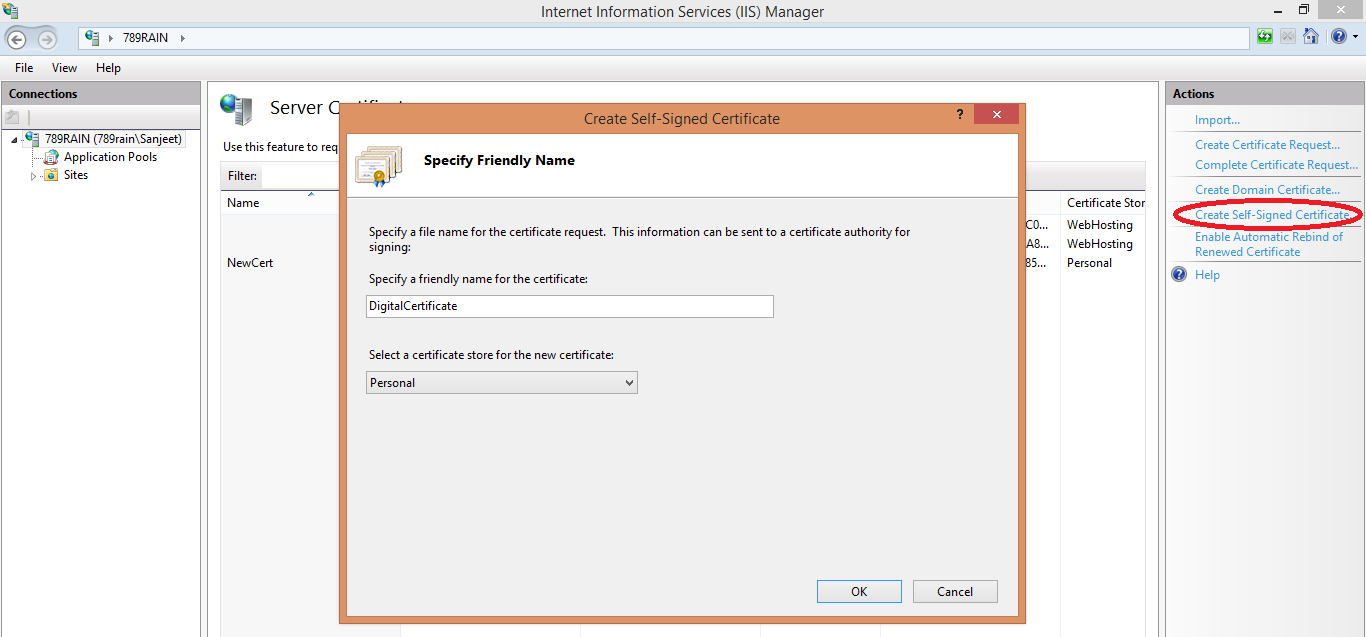 |
| Create Self Signed Certificate |
Step 2: export the certificate, double click on your certificate, go to details and choose copy to file. Export the private keys, otherwise we are going to face key not found error.
 |
| Save Certificate |
 |
| Export Private keys |
 |
| Choose personal information exchange |
 |
| Set password for your certificate |
 |
| Give name to your pfx file |
 |
| Complete the certificate wizard |
Step 3: place your certificate in the certificate store. Open Microsoft management console by going to start and type mmc.
Go to file and choose add/remove snap in option. Choose Certificates add and click ok. Choose the location where you want to save the certificate
 |
| Microsoft Management console |
 |
| Choose My user Account Locally or Computer Account when on Server |
Step 4: go to Personal folder, right click to import the certificate in the certificate store. Choose the certificate which you want to import
 |
| import the certificate |
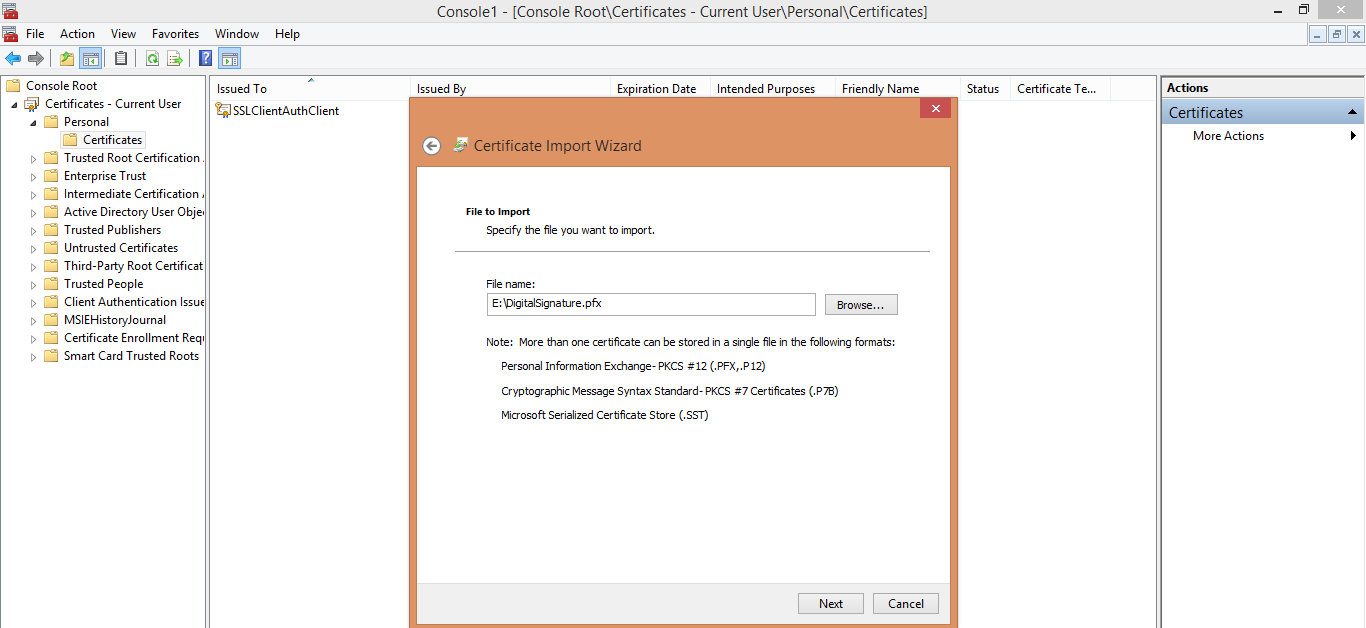 |
| Choose the Certificate |
 |
| password the certificate |
 |
| Place the certificate in the Store |
 |
| Complete the import process |
Step 5: export the certificate, which we are going to verify the digital signature. Follow the same steps as discussed above.
 |
| Export the Certificate |
 |
| Export the Certificate |
 |
| Name your Certificate and complete the process |
Step 6: now certificate is created and placed in the certificate store, now is the time to use in our program.
In aspx file: in designing page we are placing the code to show, whether document is digitally signed or not.
<div>
<asp:Label ID="lblHeading" runat="server" Text="Digital signature"></asp:Label><br />
<br />
<asp:Panel runat="server" BorderWidth="1" BorderColor="Black" Width="250">
<asp:Label runat="server" ID="lblSigned" ></asp:Label><br />
<asp:Label ID="lbltext" runat="server"></asp:Label>
</asp:Panel>
</div>
In aspx.cs file: in code file, we are signing and verifying the signature.
protected void Page_Load(object sender, EventArgs e)
{
try
{
// Sign text
byte[] signature = Sign("DigitalSign", "CN=789rain");
//Verify Text
if (Verify("DigitalSign", signature, @"E:\search\Digital Signature\DigitalSignature.cer"))
{
lblSigned.Text = "Digitally Signed By :";
lbltext.Text = "Sanjeet";
}
else
{
lbltext.Text = "ERROR: Signature not valid!";
}
}
catch (Exception ex)
{
lbltext.Text = "EXCEPTION: " + ex.Message;
}
}
static byte[] Sign(string text, string certSubject)
{
// Access Personal (MY) certificate store of current user
X509Store my = new X509Store(StoreName.My, StoreLocation.CurrentUser);
my.Open(OpenFlags.ReadOnly);
// Find the certificate we’ll use to sign
RSACryptoServiceProvider csp = null;
foreach (X509Certificate2 cert in my.Certificates)
{
if (cert.Subject.Contains(certSubject))
{
// We found it.
// Get its associated CSP and private key
csp = (RSACryptoServiceProvider)cert.PrivateKey;
}
}
if (csp == null)
{
throw new Exception("No valid cert was found");
// Hash the data
SHA1Managed sha1 = new SHA1Managed();
UnicodeEncoding encoding = new UnicodeEncoding();
byte[] data = encoding.GetBytes(text);
byte[] hash = sha1.ComputeHash(data);
// Sign the hash
return csp.SignHash(hash, CryptoConfig.MapNameToOID("SHA1"));
}
protected bool Verify(string text, byte[] signature, string certPath)
{
// Load the certificate we’ll use to verify the signature from a file
X509Certificate2 cert = new X509Certificate2(certPath);
RSACryptoServiceProvider csp = (RSACryptoServiceProvider)cert.PublicKey.Key;
// Hash the data
SHA1Managed sha1 = new SHA1Managed();
UnicodeEncoding encoding = new UnicodeEncoding();
byte[] data = encoding.GetBytes(text);
byte[] hash = sha1.ComputeHash(data);
// Verify the signature with the hash
return csp.VerifyHash(hash, CryptoConfig.MapNameToOID("SHA1"), signature);
}
Step 7: if certificate is valid and signed text is verified than signature signed by Sanjeet will be shown otherwise Invalid certificate will be shown
 |
| Valid Certificate Message |


0 comments:
Post a Comment