Showing posts with label Web Stuf. Show all posts

Sunday, 28 August 2016

Digitally signing a webpage using self signed certificate in asp.net

Digital Signature

Digitally Signing a Web page as the name implies signing a webpage using digital certificate for maintaining the authenticity of the page. The most common use of a digital certificate is to verify that a user sending a message is who he or she claims to be, and to provide the receiver with the means to encode a reply. We can either use self-signed certificate or the certificate issued by Certificate authority (CA). The CA issues an encrypted digital certificate containing the applicant’s public key and a variety of other identification information. The CA makes its own public key readily available through print publicity or perhaps on the internet. Both self-signed and CA signed certificates provide encryption for data in motion. A CA-signed certificate also provide authentication – a level of assurance that the site is what it reports to be, and not an impostor website.

Implementation


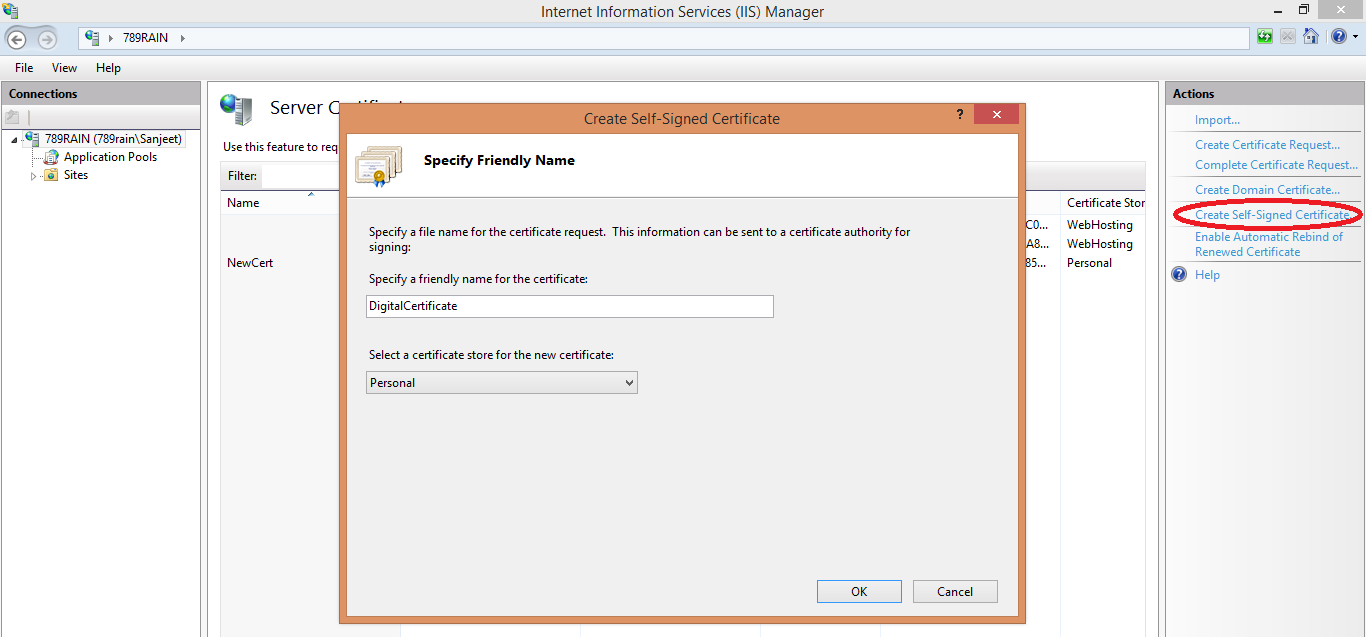
Step 1: Here I am using Self-signed certificate for signing the webpage. So first step will be to create the Self-signed certificate. Open IIS Manager by going to start and type inetmgr to open IIS. Choose server certificate and click create self-signed certificate in the action pane.
IIS Manager

Create Self Signed Certificate

Step 2: export the certificate, double click on your certificate, go to details and choose copy to file. Export the private keys, otherwise we are going to face key not found error.
Save Certificate
Export Private keys
Choose personal information exchange
Set password for your certificate
Give name to your pfx file
Complete the certificate wizard
Step 3: place your certificate in the certificate store. Open Microsoft management console by going to start and type mmc.
Go to file and choose add/remove snap in option. Choose Certificates add and click ok. Choose the location where you want to save the certificate
Microsoft Management console
Choose My user Account Locally or Computer Account when on Server
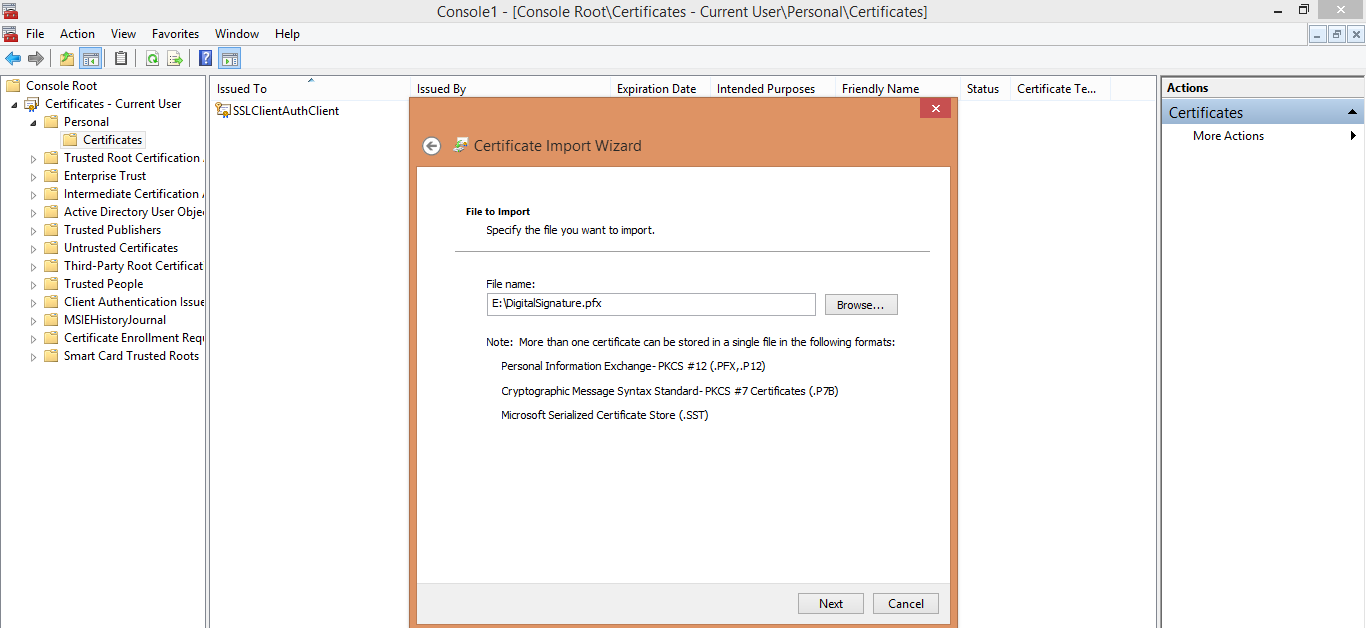
Step 4: go to Personal folder, right click to import the certificate in the certificate store. Choose the certificate which you want to import
import the certificate
Choose the Certificate
password the certificate
Place the certificate in the Store
Complete the import process
Step 5: export the certificate, which we are going to verify the digital signature. Follow the same steps as discussed above.
Export the Certificate
Name your Certificate and complete the process
Step 6: now certificate is created and placed in the certificate store, now is the time to use in our program.

In aspx file: in designing page we are placing the code to show, whether document is digitally signed or not.

<div>
            <asp:Label ID="lblHeading" runat="server" Text="Digital signature"></asp:Label><br />
            <br />
            <asp:Panel runat="server" BorderWidth="1" BorderColor="Black" Width="250">
                <asp:Label runat="server" ID="lblSigned" ></asp:Label><br />
                <asp:Label ID="lbltext" runat="server"></asp:Label>
            </asp:Panel>
        </div>


In aspx.cs file: in code file, we are signing and verifying the signature.

     protected void Page_Load(object sender, EventArgs e)
    {
        try
        {
            // Sign text
            byte[] signature = Sign("DigitalSign", "CN=789rain");
           
            //Verify Text
            if (Verify("DigitalSign", signature, @"E:\search\Digital Signature\DigitalSignature.cer"))
            {
                lblSigned.Text = "Digitally Signed By :";
                lbltext.Text = "Sanjeet";
            }
            else
            {
                lbltext.Text = "ERROR: Signature not valid!";
            }
        }
        catch (Exception ex)
        {
            lbltext.Text = "EXCEPTION: " + ex.Message;
        }
    }

    static byte[] Sign(string text, string certSubject)
    {
        // Access Personal (MY) certificate store of current user
        X509Store my = new X509Store(StoreName.My, StoreLocation.CurrentUser);
        my.Open(OpenFlags.ReadOnly);


        // Find the certificate we’ll use to sign           
        RSACryptoServiceProvider csp = null;
        foreach (X509Certificate2 cert in my.Certificates)
        {
            if (cert.Subject.Contains(certSubject))
            {
                // We found it.
                // Get its associated CSP and private key
                csp = (RSACryptoServiceProvider)cert.PrivateKey;
            }
        }
        if (csp == null)
        {
            throw new Exception("No valid cert was found");
    // Hash the data
        SHA1Managed sha1 = new SHA1Managed();
        UnicodeEncoding encoding = new UnicodeEncoding();
        byte[] data = encoding.GetBytes(text);
        byte[] hash = sha1.ComputeHash(data);
        // Sign the hash
        return csp.SignHash(hash, CryptoConfig.MapNameToOID("SHA1"));
    }
    protected bool Verify(string text, byte[] signature, string certPath)
    {
        // Load the certificate we’ll use to verify the signature from a file
        X509Certificate2 cert = new X509Certificate2(certPath);
        RSACryptoServiceProvider csp = (RSACryptoServiceProvider)cert.PublicKey.Key;


        // Hash the data
        SHA1Managed sha1 = new SHA1Managed();
        UnicodeEncoding encoding = new UnicodeEncoding();
        byte[] data = encoding.GetBytes(text);
        byte[] hash = sha1.ComputeHash(data);


        // Verify the signature with the hash
        return csp.VerifyHash(hash, CryptoConfig.MapNameToOID("SHA1"), signature);
    }

Step 7: if certificate is valid and signed text is verified than signature signed by Sanjeet will be shown otherwise Invalid certificate will be shown
Valid Certificate Message

Implementing google reCaptcha in Websites or Webpages using asp.net mvc

Google reCaptcha

reCaptcha is a free google service and uses an advanced risk analysis and adaptive Captcha's to keep away automated software from engaging in abusive activities on our site and allow valid user pass through with ease.
There are software that can increase the number of hit to the server which can impact the server functionality and if number of request rises above the server capacity, it can cause server down. Google reCaptcha can prevent such conditions.

Implementation

Step 1: First you need to sign up for reCaptcha. Go to https://www.google.com/recaptcha/intro/index.html

Sign up for reCaptcha

Step 2: fill the information in register form and click register.
Register for reCaptcha
Step 3: On click of register you are successfully able to generate the keys.
keys Information

Step 4: After successfully generation of the keys now we need to use it in our application for generating reCaptcha.

Old reCaptcha:
·         In your mvc application open view (.cshtml file) where you want to use reCaptch and add the following code. Replace Site/Public key with your Site key.

reCaptcha View
·         Open the controller of the above view and add FormSubmit method which is going to validate your reCaptcha. Replace Secret key with your secret key
reCaptcha controller code
·         Now browse your site to check reCaptcha. On click of create if captcha is valid Google reCaptcha validation success message will be shown otherwise reCaptcha validation failed message will be shown.
reCaptcha validation
New reCaptcha:
·         In your mvc application open view (.cshtml file) where you want to use reCaptcha and add the following code. Replace Site/Public key with your Site key.
reCaptcha view code

·         Open the controller of the above view and add FormSubmit method which is going to validate your reCaptcha. Replace Secret key with your secret key
reCaptcha controller code

·         Now browse your site to check reCaptcha. On click of Submit if check box is checked Google reCaptcha validation success message will be shown otherwise reCaptcha validation failed message will be shown.
reCaptcha validation

·         If validation failed multiple times now on checking the check box security measures will increase by increasing the strength of verification through selection of Images.
reCaptcha validation

Windows authentication to Login into multiple websites Using Asp.Net

Common Login

Common login as the name implies, providing single interface for login into multiple websites.

Implementation

Step 1: First you need to create a website which is going to act as an interface for your other websites. Let’s create a website name it CommonLogin. Now add an aspx page.
In your aspx define your websites that you needed in CommonLogin. Here I have defined three websites in my Common login.
<tr>
<td>
<asp:ImageButton runat="server" ID="imgTravelling" ImageUrl="Images/Travelling.jpg" Width="300" Height="300" OnClick="imgTravelling_Click" />
</td>
<td>
<asp:ImageButton runat="server" ID="imgSports" ImageUrl="Images/Football.jpg" Width="300" Height="300" OnClick="imgSports_Click" />
</td>
<td>
<asp:ImageButton runat="server" ID="imgMovies" ImageUrl="Images/Movies.jpg" Width="300" Height="300" OnClick="imgMovies_Click" />
</td>
 </tr>

Step 2: In your CommonLogin.cs define the URL of the websites that you have included

protected void imgTravelling_Click(object sender, EventArgs e)
    {
        if (User.IsInRole("Travelling"))
        {
            string strURL = "http://localhost:63464/TravellingHome.aspx";
            AccessPortal(strURL, UserName);
        }
        else
        {
            lblMessage.Text = "You are not aothorized for Travelling Portal";
        }
    }
    protected void imgSports_Click(object sender, EventArgs e)
    {
        if (User.IsInRole("Sports"))
        {
            string strURL = "http://localhost:18782/SportsHome.aspx";
            AccessPortal(strURL, UserName);
        }
        else
        {
            lblMessage.Text = "You are not authorized for Sports";
        }
    }
    protected void imgMovies_Click(object sender, EventArgs e)
    {
        if (User.IsInRole("Movies"))
        {
            string strURL = "http://localhost:63839/MoviesHome.aspx";
            AccessPortal(strURL, UserName);
        }
        else
        {
            lblMessage.Text = "You are not authorized for Movies Portal";
        }
    }

    private void AccessPortal(string strURl, string UserName)
    {
        RemotePost myremotepost = new RemotePost();
        myremotepost.Url = strURl;
        myremotepost.Add("UserName", UserName);
        myremotepost.Post();
    }
}

public class RemotePost
{
    private System.Collections.Specialized.NameValueCollection Inputs = new System.Collections.Specialized.NameValueCollection();

    public string Url = "";
    public string Method = "post";
    public string FormName = "form1";

    public void Add(string name, string value)
    {
        Inputs.Add(name, value);
    }

    public void Post()
    {
        System.Web.HttpContext.Current.Response.Clear();
        System.Web.HttpContext.Current.Response.Write("<html><head>");
        System.Web.HttpContext.Current.Response.Write(string.Format("</head><body onload=\"document.{0}.submit()\">", FormName));
        System.Web.HttpContext.Current.Response.Write(string.Format("<form name=\"{0}\" method=\"{1}\" action=\"{2}\" >", FormName, Method, Url));
        for (int i = 0; i < Inputs.Keys.Count; i++)
        {
            System.Web.HttpContext.Current.Response.Write(string.Format("<input name=\"{0}\" type=\"hidden\" value=\"{1}\">", Inputs.Keys[i], Inputs[Inputs.Keys[i]]));
        }
        System.Web.HttpContext.Current.Response.Write("</form>");
        System.Web.HttpContext.Current.Response.Write("</body></html>");
        System.Web.HttpContext.Current.Response.End();
    }
}


Step 3: In your WebConfig define authentication and define roles which can access the websites. You can also use Membership users and roles functionality of sql server for authorization. I have used Active directory user and roles.

    <authentication mode="Windows">
    </authentication>
    <authorization>
      <allow roles="Sports,Movies,Travelling"/>
      <deny users="*"/>
    </authorization>

 Step 4: Host your websites on IIS and choose authentication mode Windows.

Hosting on IIS
Step 5: I have created three roles Sports, Travelling and movies and assigned to users. When I run the website windows authentication pop up will be shown. On entering the correct information user will be redirected to Commonlogin website.

Windows Authentication
Step 6: I have provided the credentials of Sandeep who has the Sports roles.

Windows Authentication
Step 7: common login home page will open when authentication is OK.

common login
Step 8: When Sandeep will try to access portal other than Sports. You are not authorized message will be shown
Unauthorized access
Step 10: if he accesses the Sports portal he will Redirected to that portal.
Sports Home
Step 11: same goes with the other user they are only able to access that portal, which they are authorized of. Reena will only able to access movies portal while Amit will only able to access travelling portal.
Reena Homepage
Movies HomePage